

How Can I Print 2.5 Cm X 6.6 Cm Labels Without A Template
Template Tuesday Presents...how to create label templates in Word using Create Labels & Insert Table tools.
How To Create A Label Template In Word Using Create Labels
With "Create Labels", you enter the measurements of your sheet labels and the tool automatically creates a suitable label template. You will need the following measurements:
- Page Size (and Orientation)
- Page Margins (Top Margin and Left Margin)
- Label Height and Width
- Vertical Pitch and Horizontal Pitch
- Number of Labels Per Row (Across) and Per Column (Down)
To start the Create Labels tool, open a new blank document in Word. Click on the Mailings tab and select Labels (on the left hand side). This opens a dialogue box called Envelopes and Labels. To create a template:
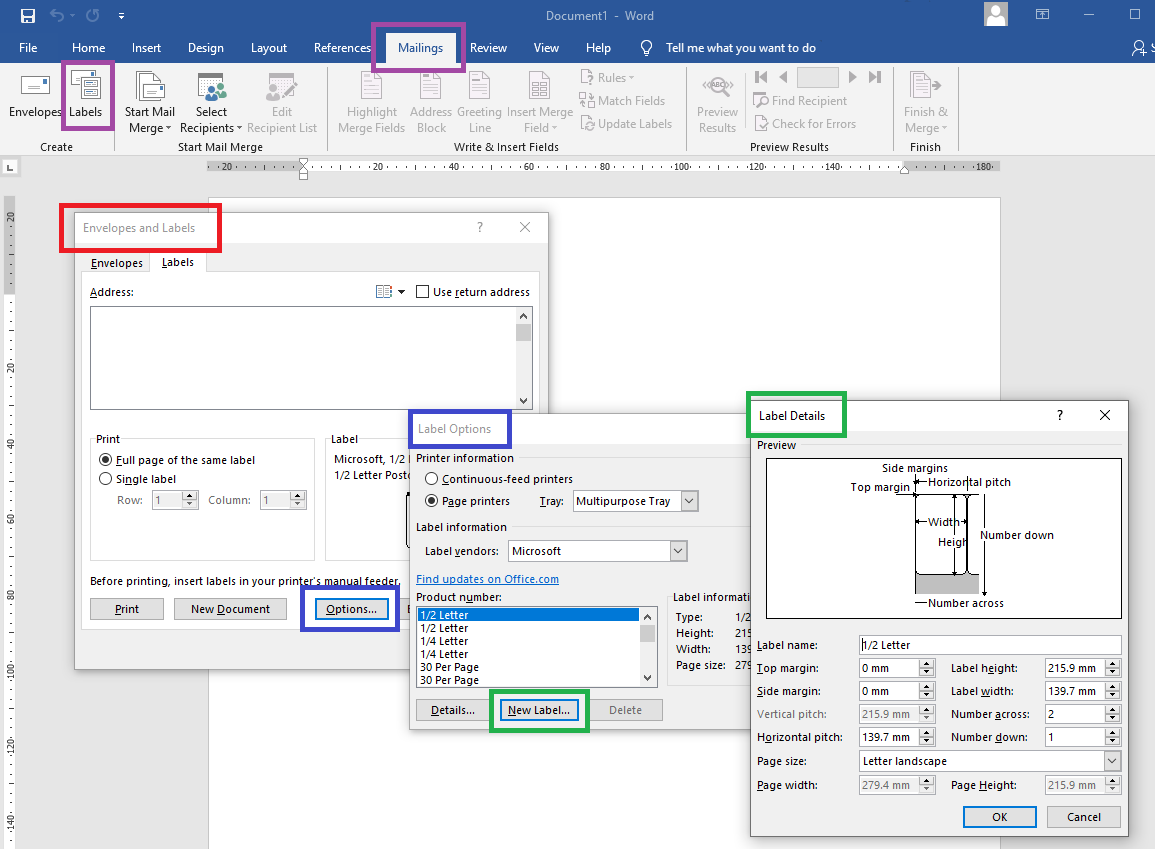
Step 1: Click on Options; this opens a dialogue box called Label Options.
Step 2: Click on New Label; this opens a dialogue box called Label Details.
Step 3: Enter your required measurements. We recommend using this order:
- Page Size (& Orientation) – A4 is 210mm by 297mm.
- Labels Across & Labels Down – number of labels in each row and column.
- Label Width & Height – for round labels, enter the diameter into both fields.
- Vertical Pitch & Horizontal Pitch – these are label height plus row gap height and label width plus column gap width respectively. If there are no gaps enter just the label height or width.
- Top Margin & Side (Left) Margin – if Word takes issue with the measurements you've provided so far, set all the margins to 0mm, enter your other measurements again, and then add in your margins.
Step 4: Give your template a name, and click OK. This returns you to Label Options.
Step 5: Click on OK; this returns you to Envelopes and Labels.
Step 6: Click on New Document; this opens a new document containing your template.
Template Tuesday Top Tips For Using The Create Labels Tool
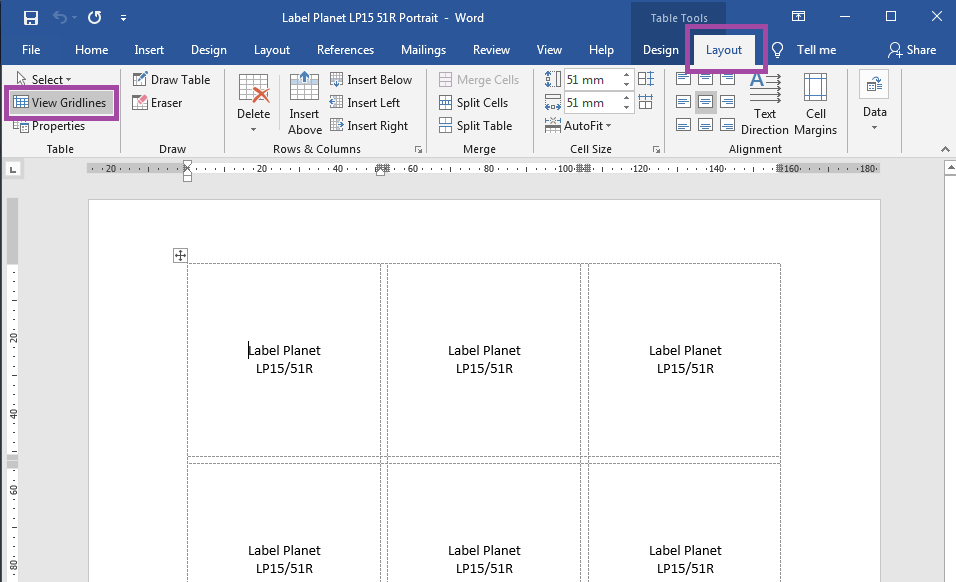
- Word templates represent sheet labels using a table. Each cell represents a label (or a gap between labels). They can only represent labels as a grid of rectangles and/or squares; they cannot show any shaping, including oval and round labels or rounded corners on rectangle and square labels.
- The table is borderless so it doesn't get printed along with your designs. Its outlines will be shown as dotted grey lines. If you cannot see the table, Table Gridlines are turned off. Left click once anywhere in the middle of the page to bring up the Table Tools Layout tab at the top of the page. Click on the View Gridlines button on the left hand side.
- Enter your measurements (except number across/down) as a value, followed by a single blank space, followed by the measurement unit symbol. For example: "70 mm".
- Word uses centimetres by default. Label measurements tend to use millimetres. You can stick with centimetres (and convert the measurements) or change Word's measurements to millimetres.
Word: Click on File, Options, and Advanced. Scroll to Display and set "Show Measurements in units of" to millimetres.
Word For Mac: Click on "Word" in the menu bar and select "Preferences". Select "General" from Authoring & Proofing Tools, and set "Measurement units" to millimetres. - After creating your template, save a copy before adding your design.
How To Create A Label Template In Word Using Insert Table
As Word templates are basically tables, you can simply create a table that replicates your labels. You will need the same measurements as above BUT you will need row gap heights and column gap widths (rather than vertical and horizontal pitches) and all four page margins. There are two stages: creating a suitable starting document and adding a suitable table.
Create A Suitable Starting Document
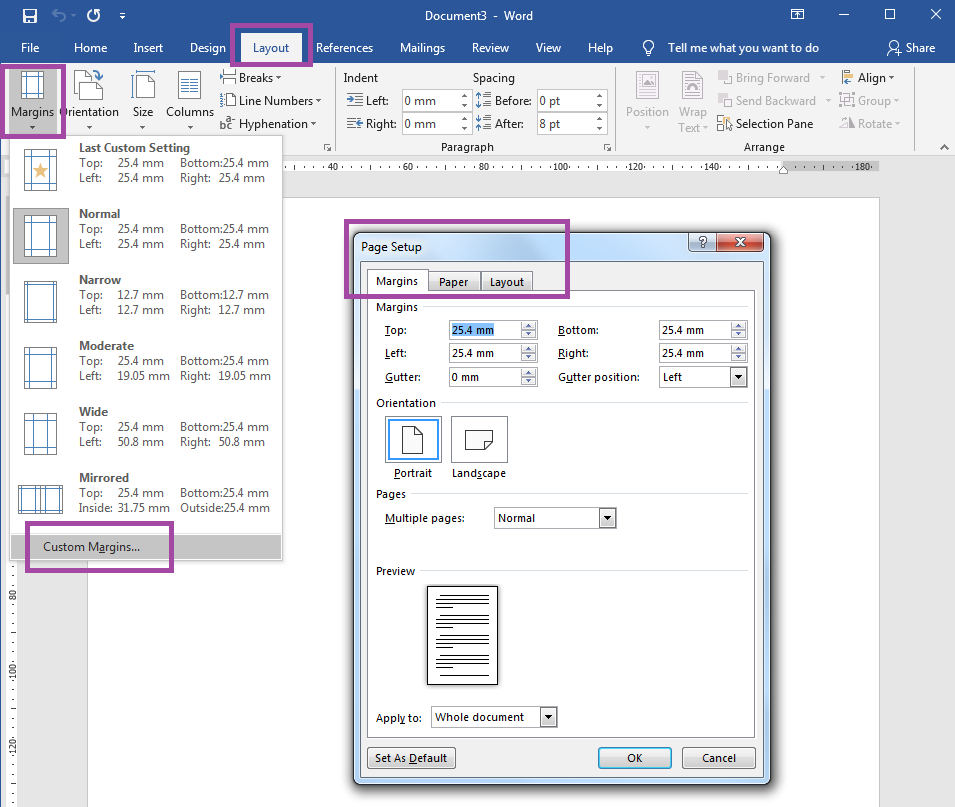
- Open a new blank document in Word. This creates a portrait A4 page. To create a landscape template, click on the Layout tab, then on Orientation, and select Landscape.
- Next you need to enter the correct measurements and margins for your page. Click on the Margins option in the Layout tab and select Custom Margins. This will open a Page Setup dialogue box.
- On the Margins tab, enter your top, bottom, left, and right page margins and set the gutter margin to 0mm.
- On the Paper tab, check that the page size is A4 with the measurements 210mm and 297mm.
- Finally, on the Layout tab, set the header and footer to 0mm. Click OK to make your changes.
Word may now warn you that your margins are "outside the printable area". You can ignore this warning. If Word splits your table onto two pages (or adds a blank page), set the bottom margin to 0mm.
Add A Suitable Table
- Click on the Insert tab at the top of the page. Select Table and Insert Table.
- Enter the number of rows and columns you need and press OK.
- If there are no gaps between your labels, enter the number of rows and columns.
- If there are gaps, you can represent them with additional blank rows and columns OR incorporate them into the rows and columns that represent their own rows and columns where possible. So, for example, if you have three columns with gaps, you need a table with five columns (three representing the labels themselves and two representing the gaps).
Editing Your Table
This adds a generic table; it needs amending to create a suitable template. Move your cursor to the top left corner of the table and left click on the four headed arrow icon that appears to select the table. Make these changes:
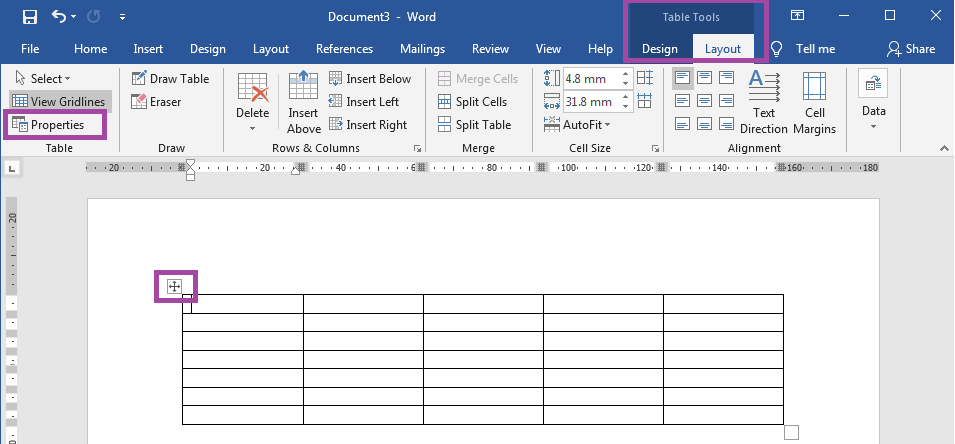
- Remove Borders; select the Table Tools Design tab, click on Borders, and select No Borders.
- Set Table Properties; select the Table Tools Layout tab and click on the Properties button. Click on the Table tab. Under size, set the preferred width to the total width of your labels (i.e. from the left edge of the first column to the right edge of the last column). Under alignment, select "Center". Click on Options, set cell margins and spacing to 0mm, and turn off "automatically resize to fit contents".
- Set Row Properties; click on the Row tab in Table Properties. Under size, enter your label height and set it to "Exact" (NOT "At least"). Under options, deselect both options. If there are gaps, use "Next Row" to change each row height as needed.
- Set Column Properties; click on the Column tab in Table Properties. Under size, enter your label width. If there are gaps, use "Next Column" to change each column width as needed.
- Set Cell Properties; click on the Cell tab in Table Properties. We recommend a centralised alignment but this depends on your label design. Under options, set cell margins to "Same as the whole table", select "Wrap text", and deselect "Fit text".
- Centralise Table; click on the Table Tools Layout tab and select the centre icon in the set of nine alignment options.
Finally, we recommend saving a copy of your blank label template before adding your design.
Next Week On Template Tuesday: Conflict Resolution – How To Make Sure Your Software & Your Template Are Compatible
How Can I Print 2.5 Cm X 6.6 Cm Labels Without A Template
Source: https://www.labelplanet.co.uk/how-to/templates-news/how-to-create-label-templates-word/
Posted by: dupreywroing.blogspot.com
0 Response to "How Can I Print 2.5 Cm X 6.6 Cm Labels Without A Template"
Post a Comment